Table of Contents
Google Chrome is one of the extremely fast web browsers; it loads and displays pages quickly. Google published the first version in 2008 and completely overhauled the browser until 2018. In 10 years’ time, its popularity has grown with Google’s marketing effect and with the easy-to-use interface. According to Statcounter statistics, in 2019 Chrome reached 70% of the global desktop browser market share.
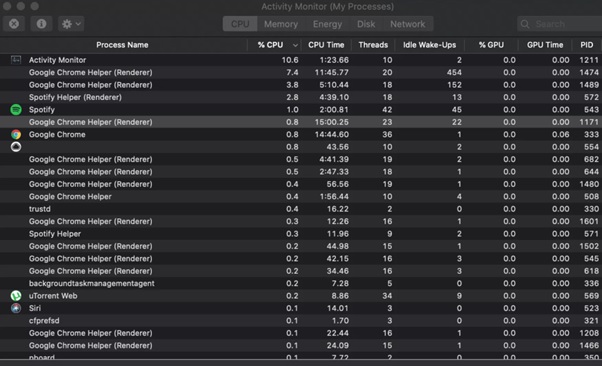
Though everyone is moving on to Chrome, it has its own pros and cons. If you are a Mac user, you are probably aware of “Google Chrome Helper (Renderer)” or “Google Chrome Helper (GPU)“. Tasks eat up all of your CPU as well as memory, so we have a few solutions for you. By implementing these solutions, you can easily disable it and solve your MAC’s slowing down problem.
What is Google Chrome Helper?
“Google Chrome Helper” is an interface that exists between the code embedded in the browser and a server located. It runs as soon as you launch the browser because of the default setting of Google Chrome. Similar to the Web-Helper process, the Google Chrome Helper is a process that gets triggered off the moment you start the browser.
Is Google Chrome Helper causing my system to slow down?
Chrome’s biggest draw is its multi-process architecture, which, in a nutshell, protects you from having a bad web page or application take your browser down. Every tab, window and plug runs in its own environment, so one faulty site won’t affect anything else that you have open on other tab, which adds another layer of security.
Users love this browser because of its Sync option, extension support, and cross-platform compatibility. But if you are using the Google Chrome browser on your Mac, then you might be aware of the nagging Google Chrome Helper that’s hidden in the Activity Monitor menu. Chrome requires a lot of memory to operate. It loads a large number of scripts and extensions that consume the majority of the RAM, causing other apps to run on very little RAM, which makes your computer run slowly. The real problem comes when the Chrome Helper goes amuck, and many processes related to Google Chrome start running at the same time, which ultimately consumes a lot of CPU memory and reduces the speed of the computer.
Isn’t it problematic? In this article, we will look at how to disable Google Chrome Helper to boost your CPU cycles and speed up the computer.
It is very easy to disable the Google Chrome Helper to make your Mac laptop enjoy most CPU usage. You have to go deep into Google Chrome settings to deactivate the Google Chrome Helper.
Steps to Stop the Google Chrome Helper:
Along with Google Chrome Helper, malicious extensions and malicious software have to be disabled from your Macbook as well. Go for a thorough check to keep your system clean from unwanted programs and viruses before fixing Mac problems. We have covered three methods that will help in reducing the usage of Chrome memory on your Mac device.
Method 1:
- Open Google Chrome on your system by double-clicking on the icon.
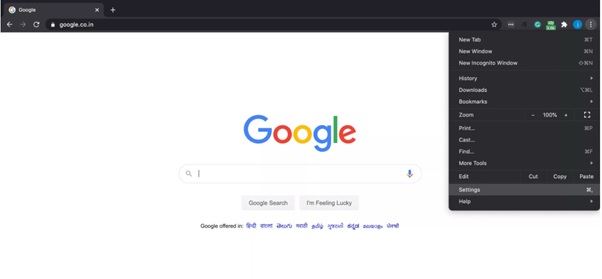
- Click on the Three dots icon that you can able to see in the top right corner of the Chrome Browser.
- Select the “Settings” option from the drop-down list.
- Scroll down and click on the “Advanced” Setting option.
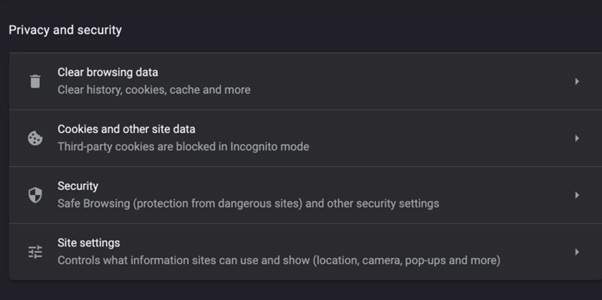
- Under the “Privacy & Security” option, select “Site Settings”.
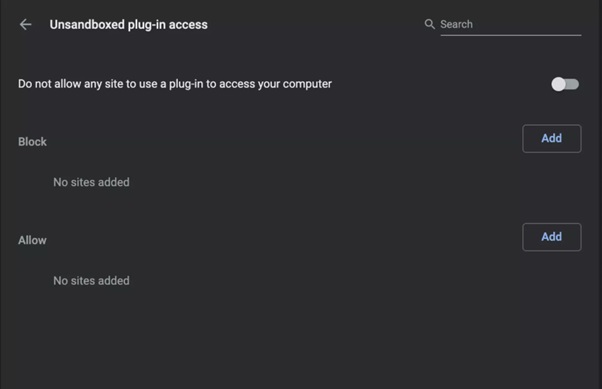
- Here on the “Site Settings” Tab, Head over to Permissions > > Additional Permissions and then select Unsandboxed Plug-in Access.
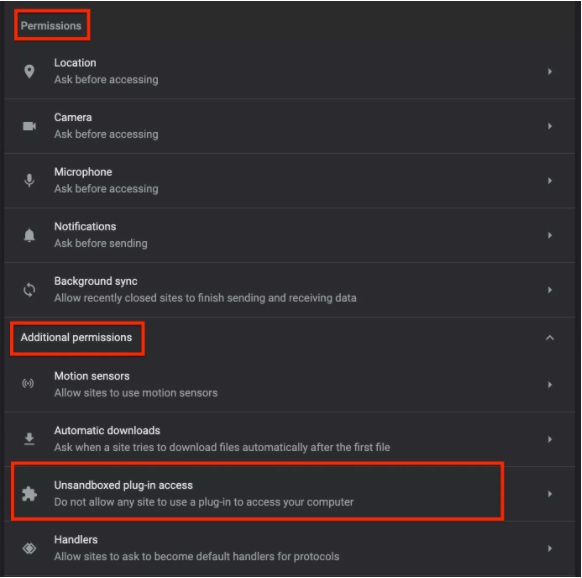
- Here, click on the Toggle Button to change its colour to Grey and the text to “Do not allow any site to use a plug-in to access your computer.
That’s it. Now close the Browser app and do not forget to close it from the below menu. Restart the Chrome Browser App again.
Method 2:
Most of the Extensions apps load a lot of background scripts and codes whenever you visit a new website and this results in slow website speed and Chrome using extra memory on your system.
This method will help you to disable all the unwanted and unnecessary extensions from your browser.
- Open Google Chrome on your system by double-clicking on the icon.
- Click on the Three dots icon that you can able to see in the top right corner of the Chrome Browser.
- Click on More tools > > Extensions.
- Here you will find a list of all the extensions that are currently installed on your browser.
- Click on the “Remove” button and click on the Toggle button.
- Finally, exit the window and quit your browser. Restart your browser after some time.
Once you have managed to disable the Google Chrome Helper, you can stop Flash ads from loading which fetch third-party scripts and codes that make the website slow, which eventually increases the Google Chrome Helper processes and slows down your system.
The Process to stop Flash ads:
- Open Google Chrome on your system by double-clicking on the icon.
- Click on the Three dots icon that you can able to see in the top right corner of the Chrome Browser.
- Select the “Settings” option from the drop-down list.
- Under “Privacy and Security”, click on “Site Settings”.
- Click on Pop-ups and redirects. Make sure the toggle button is Off.
- Go back and click on Ads. Again, make sure that the toggle button is Off.
If you have more questions regarding this article, you can feel free to let us know in the comment section. We will be happy to help you.
 and speedup the PC.)