Table of Contents
If you are planning to save some of your valuable time on social media, then scheduling your Facebook posts can indeed be a viable option for you. Not only scheduling, Facebook also gives you the option and flexibility of editing a post which is once scheduled. Scheduling of the posts in Facebook is undoubtedly a preferred option when you do not opt to be online throughout the day and concentrate on other important chores.
This write-up aims at disseminating some relevant information that will assist you in discovering the process of scheduling and editing your Facebook posts with the aim of saving your time and energy.
1. Scheduling the Facebook Posts
Facebook’s had introduced its scheduling feature which can undoubtedly prove to be a lifesaver when you just possess some of the basic updates to be shared over a passage of time or if you are busy in some more important works outside of office. All these time, you must have been tediously logging into Facebook 24X7 in order to update your status, pics or marketing materials. In order to save all these initiatives and let you concentrate on more important works, you can now go to Facebook settings and use the schedule option to update your posts at a later time. Schedule Facebook posts very conveniently using the feature whenever you are running out of time.
How to schedule the posts on Facebook? When you are using this option of scheduling the posts in Facebook, you now have the option of choosing the date and time of day when you wish to publish, your targeted audience and the preferred location–and believe me this is absolutely easy.
All you need to do is to visit your Facebook page, then type the desired update and also include a necessary link, image or video as needed. This associated image always appears under your status update. With the aim of customizing that particular image, you have two viable options: firstly where you can choose an image from the link source or secondly you can also upload your own image as per your discretion.
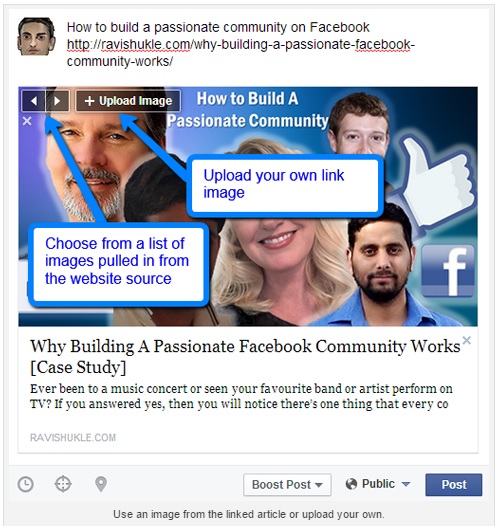
In case, you are willing to use an image which has been generated from the linked site, then you should necessarily use the arrows which appear in the top left corner for the purpose of browsing and choosing the one that you wish to upload. Or, if you are intending to upload your own image, then you may click +Upload. While in the process of uploading your own image, it has to be ensured that it is 1200 x 627 pixels in order to fetch the best of results.
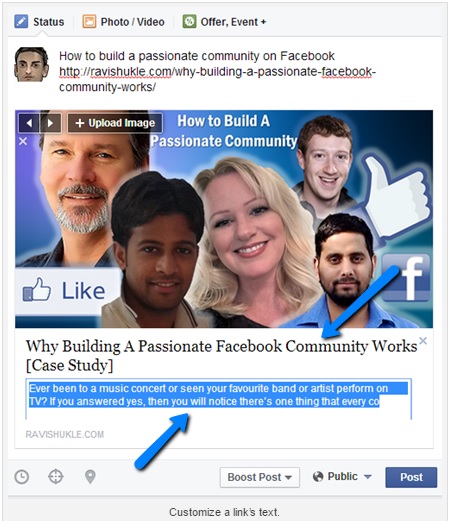
When you already possess the image set, then you may have the option to customizing the title of the post and also you may change the description by just clicking on either you wish and then typing the new text as per your requirement.
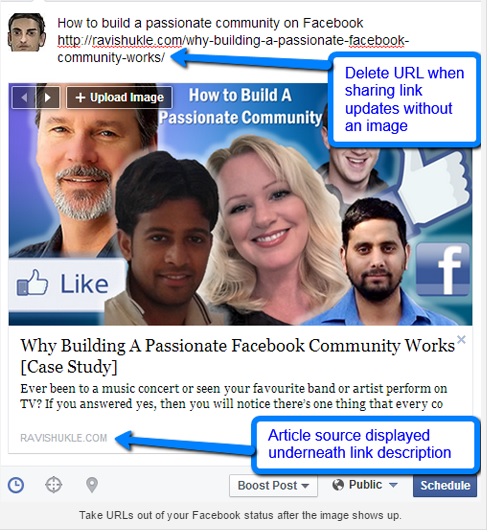
Here is a crucial tip: If you are using a link in the body of the main update, then you have to ensure sure that you delete the URL from the status box once you have chosen the desired image. That way it looks much cleaner and the users can very well click the preview image in order to reach your article.
It’s crucial to take a note that once you are in the process of scheduling an update with a link or an image, you do not possess the option of editing the image under any circumstances. In such a case, you require to delete the whole update and then start right from the scratch. (It is certainly not a big deal, but something to be aware of.)
In order to select a preferred time to get your post published, it is required to click on the clock icon and then continue to choose a date and time.
If you are willing to add targeting to your update, then you require clicking on the target icon and then choosing from the different options which are available out there. In the top right corner, you will be able to see a display letting you know the figure depicting how many people your post will target based on the various options that you may chose from.
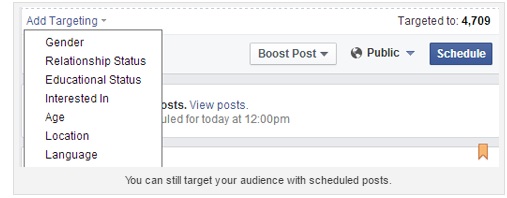
If you are willing to add a location to your post, you are then required to click on the map pointer icon and then type in your desired location that you are willing to target. This selected location will be completely visible next to your Facebook update.
2. Editing the Scheduled Posts
We all are humans and we may commit a mistake while in the process of scheduling a Facebook post. It’s OK to commit a mistake while scheduling a post in Facebook. We all do it. Facebook gives you the option of editing your posts after you’ve scheduled them.
However, this is to be borne in mind that you only have the option of editing the main text of the update and not any of the images or links that are contained in the scheduled post. If you are willing to change a link or a certain image and also any of the descriptions attached to the scheduled post, you will have to necessarily delete the scheduled post, redo it and then reschedule it again.
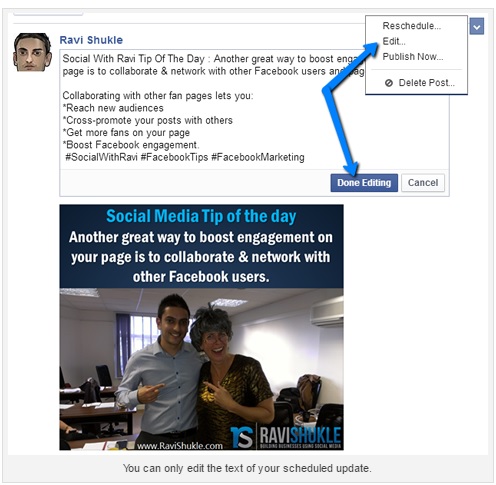
Editing of the main update body text of your post after it has been scheduled is possible. In order to execute that, all you need is to visit your activity log and then find the post that you want to edit. You can also choose to hover your curser over the scheduled post with the intention of revealing an arrow in the top right corner and then clicking the arrow. Choosing the Edit option from the menu, then editing your post as necessary and then clicking Done Editing will help you make the necessary changed in the already scheduled post. Once you are done with this, your post will still get published at the assigned time.
3. Reschedule Posts
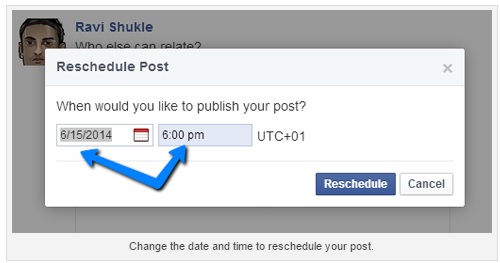
In case you want to make a change to the date or time of a scheduled post, even that is possible. No problem in doing that. All you need to do id to get back to your activity log, then find the post you want to reschedule and then click the arrow. You are then required to choose Reschedule option present in the menu.
Once you follow the above steps, you will instantly view a pop-up box wherein you can make changes to the date and time of your post. Then click on the Reschedule option and your job is done. This post will be published at the selected new date and time as per the changes made by you.
The social media is certainly dynamic with very frequent up gradations, which means you have to adapt to it quickly too. Suppose if you have scheduled a post for later half in the week and then suddenly you need to post it sooner in order to keep up with a change or trend, in such a case, Facebook provides you the option of doing that as well.
If you are willing to publish your post right away, all you need to do is to visit your activity log and then find out the post wherein you want to make the changes. After selecting the post, click the arrow and then choose Publish Now. Facebook then publishes your post live immediately.
If you feel that you no further require a scheduled post, you also have the option of deleting it using the same procedure as above but select you must chose the Delete Post option.
4. Sharing the Scheduled Posts
It certainly makes a lot of sense in sharing your update to your other social media channels or even via email among your friends and colleagues. In that front, you have good news! Facebook offers you the flexibility to find the unique URL for each of your scheduled posts so that you can share them within just a few clicks.
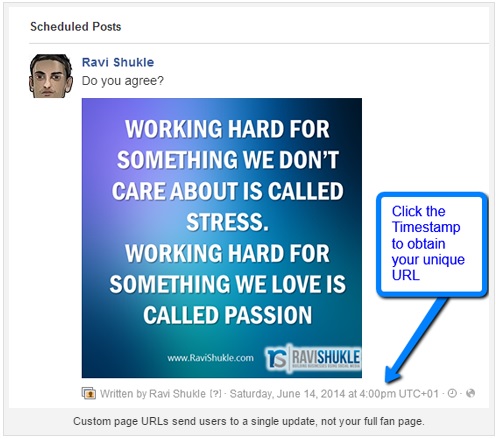
If you are willing to find out the unique URL for a scheduled post, you ought to visit your activity log and then select the Facebook post that you are intending to share. You may then click the timestamp in order to open the post followed by the coping of the page URL.
Important point to be kept in mind: The users can only witness the scheduled posts only after the update is live on Facebook. The only people who can view the post before the scheduled time are none other than the page admins.
For example, if your post is supposed to go live at 9:00pm and you have shared the link before that time, your users will be able to see a message telling them the post is not available.
In order to get around and fix that issue, you can probably use the tools like HootSuite, Buffer, AgoraPulse or PostPlanner that will enable you to schedule the shares across your other social profiles at the right time.
Hope this write-up on how to schedule a post on Facebook is useful. In case of any queries, you may leave your comment below.

